Categories and tags are built-in elements of the WordPress infrastructure that enable you to organise information on your website so that it is meaningful to visitors and easy to find. In this article, we’ll explain how you can use categories and tags and show you how to create them.
Before we start, it’s important to know that categories and tags can only be used to organise posts, they cannot be used to organise pages. If you are unsure of the difference, read our recent article about the difference between WordPress posts and pages.
What are categories and how are they useful?
Categories are a simple way to group together posts that have similar themes so that it is easy for your visitors to find them. For example, a bank website could have posts sorted into the following categories: accounts, credit cards, loans, and savings. If needed, they could create subcategories too, so under loans, they could have mortgages and personal loans and under savings, they could have ISAs and investments. This way, a visitor wanting to find posts about a specific topic could find them all grouped together in one place.
The other advantage of WordPress categories is that they are indexed by search engines. When you submit your sitemap to Google, it will understand how you have organised the content of your site and this will help show how relevant your posts are to people’s search queries, improving the chances of your individual posts ranking better in results.
How do you create a category in WordPress?
Creating a category is a simple process. Just follow these easy steps.
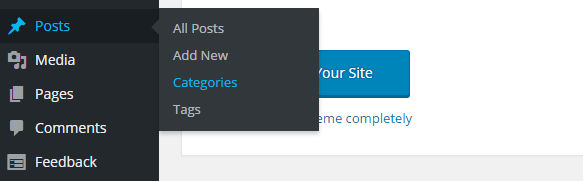
- Login to your admin panel
- Click on Posts in the sidebar and then on Categories.
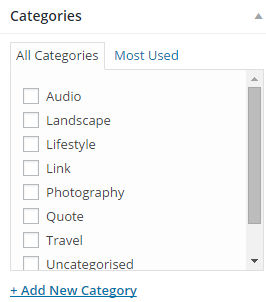
- When the Categories page opens, fill in the boxes on the left-hand side of the screen:

- Choose a name for your category and type it in the name section.
- For ease of use, type the same name, in lowercase, in the Slug section. (The slug is the part of the category name that will be used to create the category web address. If your website is www.mysite.com and your category slug is football, the address of the category page will be www.mysite.com/football. It is possible to have a slug that is different from the category name, but this can be confusing.)
- Unless you are creating a subcategory, leave the dropdown box that says Parent as it is. If you wish to create a subcategory, clicking on the dropdown box will provide a list of all the existing categories you have created. Choose the one you want your new category to be a subcategory of.
- You do not need to fill in the description box. However, if you are going to have lots of categories, it might be a helpful reminder of what the content is about when you come to allocate posts to categories.
- To finish, click the Add New Category button.
How do I assign a post to a category?
When you create a post in WordPress, you will find a range of option boxes down the right-hand side of the page. One of these is for choosing the category that you want to assign the post to. It looks like this:

Simply click on the category you want the post to go into. Once you publish the post, the allocation is complete. You can always move a post to a different category at a later time if you wish.
It is possible to put a post into more than one category, but this can be confusing for readers and can lead search engines to think you have duplicate content on your site, so it is best avoided.
How can users find categories?
You can add categories to your menus and most themes come with a category widget which you can place in your sidebar. Both of these methods will produce a list of your categories with links to their category page. Here visitors will find the posts in those categories listed in reverse chronological order.
What are tags and how are they useful?
The best way to understand a tag is to think of it as a label or like a Twitter hashtag. They are used, in a similar way to categories, to group related posts together. However, instead of using them as an alternative to a category, they are best used as a way to compliment your categories. For example, if you have a fashion website and have categories for men’s, women’s and children’s clothes and subcategories for smart and casual for each category, then adding any more categories could get confusing. Instead, you can label posts with various tags. So you might have brand tags, such as Ralph Lauren or Moschino and season tags, spring, summer, autumn and winter. If a visitor is specifically looking for posts about a brand or for seasonal clothes, they can use tags instead of categories to search for them.
Just like categories, tags can be indexed by search engines, which helps tagged posts have a better chance of ranking well in search results. However, you should avoid using too many tags.
How do you create a tag in WordPress?
- Click on Posts in the sidebar and then on Tags
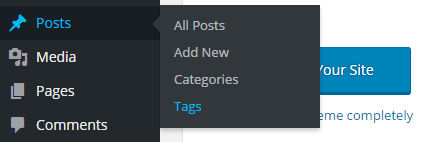
- When the Tags page opens, fill in the boxes on the left-hand side of the screen:
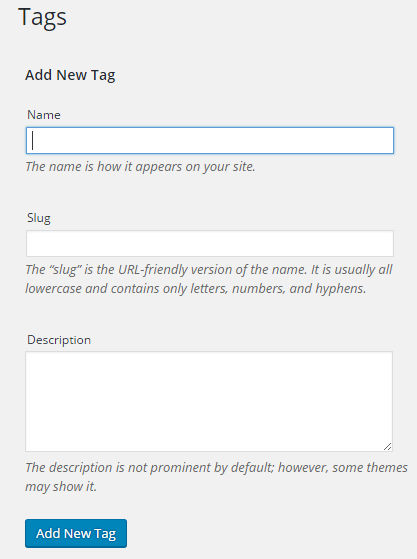
- Choose a name for your tag and type it in the name section.
- For ease of use, type the same name, in lower case, in the Slug section. (The slug is the part of the tag name that will be used to create the tag web address. If your website is www.mysite.com and your tag slug is summer, the address of the tag page will be www.mysite.com/summer. It is possible to have a slug that is different from the tag name, but this can be confusing.
- Notice, that, unlike categories you cannot have sub-tags.
- As with categories, you do not need to fill in the description box. However, if you are going to have lots of tags, it might be a helpful reminder of what the tag is used for when you come to tagging your posts.
- To finish, click the Add New Tag button.
How do I add a tag a post?
When you create a post in WordPress, you will find a range of option boxes down the right-hand side of the page. One of these is for adding tags to the post. It looks like this:
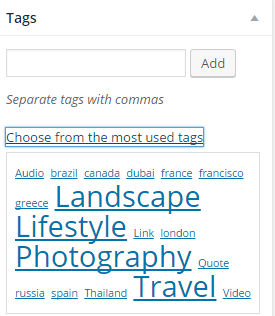
To add a tag, simply type its name in the box and click Add. The name usually appears automatically after you have started typing the first few letters. You can also create a new tag through this method. If you click on the Choose from the most used tags link, these tags will appear underneath. To use that tag, double-click it. Once you publish the post, the tag allocation is complete. You can always remove or add a tag to a post at a later time if you wish.
It is possible to give a post more than one tag; however, it is best to keep the number of tags to a minimum.
How can users find posts with a specific tag?
Generally, whilst menus are used for categories and pages, they are not used for tags. The main way to find tagged posts is through your site search. However, there are also widgets that can be displayed in your sidebar which list your most popular tags. These have links that take visitors to the tags page where they can find the posts with those tags. Some themes also display a post’s tags on an actual post, allowing visitors to find similarly tagged posts after they have finished reading.
Conclusion
You should now have a clear idea of what categories and tags are, how they are used to group similar posts together on a website, and how to create them. You should also know how to assign a post to a category and give it a tag. In addition, you should have a better understanding of how categorising and tagging posts can benefit users and improve SEO.