Gmail has over 1 billion active users, so it’s safe to assume that a lot of people know how to use it. Many people are probably wondering if they can use Gmail to manage their custom email addresses as well.
Gmail’s interface allows you to check and send emails housed under your domain. You’ll be able to use Gmail as an email client that uses POP3 to get incoming messages from your mail server and SMTP to send and receive messages.
In this post, we will explain to you how to connect to Webmail in Gmail
The steps are as follows:
- Go to your Gmail account and sign in.
You’ll need a desktop or laptop computer to finish the procedure since the options for adding additional email addresses to your account are only accessible in Gmail’s web interface. - Add a mail account by going to Settings > Accounts and Import > Add a mail account.
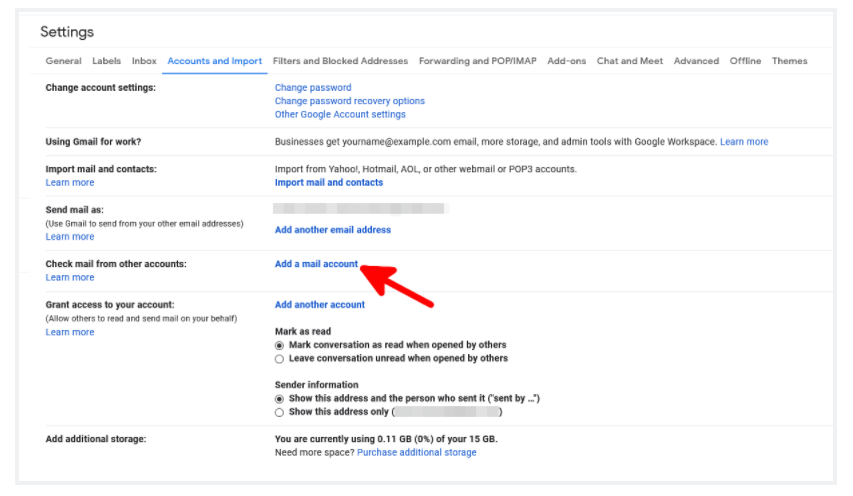
- Open the Accounts and Import tab by clicking the gear symbol in the top-right corner, selecting see all options, and then clicking the Accounts and Import tab. Click Add a mail account under the Check mail from other accounts section.
- Fill up your email address.
In the pop-up that opens, enter your unique email address and then click Next.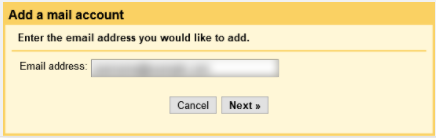
The screen provides you with two choices for managing your Gmail inbox. Click Next after selecting Import emails from my other account (POP3). - Fill up your login credentials for your personalized email address. You’ll customize how Gmail accesses your inbox on the following page. The login and password you use to check your email are the first items you’ll need to enter.
The welcome email you got after establishing your UK hosting account contains information about your POP server. You may find a copy of it in your Client Area’s My Details > Email History area.
Use Port 995 and select the Always use a secure connection (SSL) when retrieving the mail checkbox.
With the Leave a copy of retrieved messages on the server option, you can ensure that your incoming communication will be available on your Scala Hosting account. When you’re ready with the configuration, click Add Account to connect your custom email address to Gmail.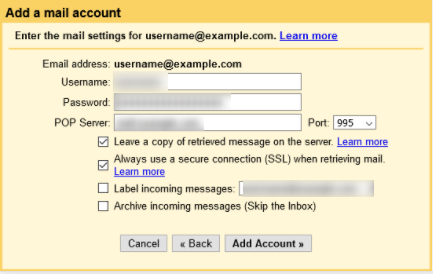
- Configure the SMTP settings for your account.
You may view all of your incoming messages using the Gmail interface by setting up a POP3 connection to your email mailbox. The next step is to configure your SMTP settings so that you may send messages from your personalized email address using Gmail.
After you set up the POP3 connection, Gmail will ask you whether you want to do it. Click Next after selecting Yes, I want to be able to send an email as [your unique email address]. You may also do it later by going to Settings > Accounts and Import and selecting Add another email address.
Gmail will first prompt you to enter a display name for messages sent from your personalised email account.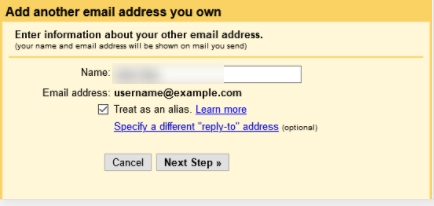
You must first confirm Gmail which SMTP server to use on the following page. Make sure port 465 is selected, as well as the Secured connection using the SSL radio option. Finally, click Add Account and provide the login details for your unique email account.
- Make sure your personalized email address is correct.
The last step is to double-check that you have access to your personalized address. Gmail will send you a confirmation email with a link and a confirmation code. To validate your email, either click the link or copy and paste the code.
This allows you to use Gmail to manage both your incoming and outgoing correspondence.
Ensure smooth email access and better deliverability with a secure email hosting solution.
Before connecting to webmail in Gmail, make sure your time zone is set correctly. Refer to our guide on How to Modify the Time Zone in Webmail for detailed instructions.