RDP- Remote Desktop Protocol is a protocol that allows users to connect and control another computer or server graphically via an existing network making it a remote connection. Basically, it is referred to as Remote Desktop Connection (mstsc.exe).
In this article, we will walk you through enabling the RDP on Windows Server 2016. Let’s check out, how to enable remote desktop protocol on your windows server.
Prerequisites
- A Server with Windows Server 2016
Enable Remote Desktop with a Graphical User Interface
Step 1: Click on the Start menu and Open Server Manager as shown in the below image.
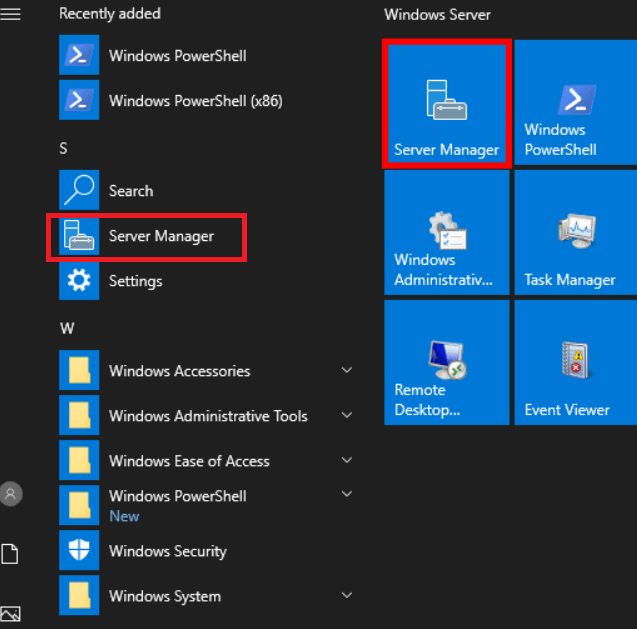
If Server Manager is not seen here, simply type “Server Manager” into the start menu to search for it. By default Server Manager will open when you log in to the GUI, otherwise you can also select it from the taskbar.
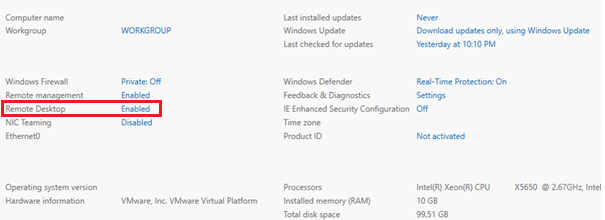
Step 2: After that, in the Server Manager window, select Local Server, you may need to wait for a little for it to detect the current state of your system. Once it is done, you can see that Remote Desktop is listed as Disabled.
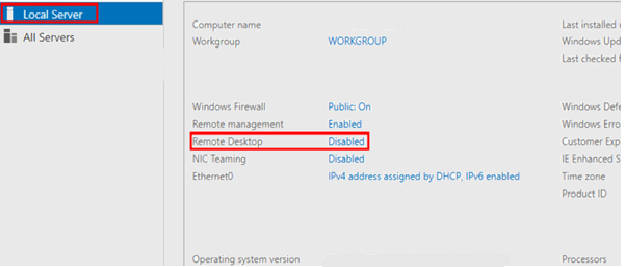
Step 3: Click on the Disabled text which will open the System Properties window.
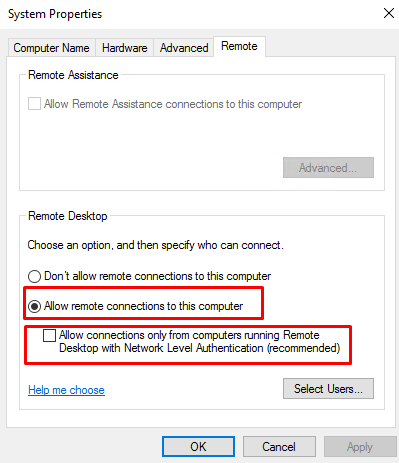
Step 4: From the System Properties window, select the “Allow remote connections to this Computer” option and Untick the checkbox as shown below.
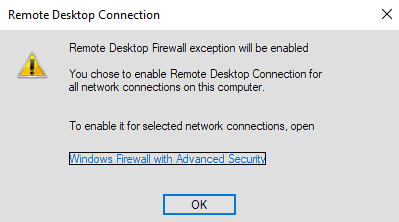
Step 5: After selecting the “Allow remote connections option” the below warning prompt will appear, advising that this will create the required firewall rules in Windows firewall to allow remote desktop traffic in from any source address, then click on OK to proceed further.
Step 6: Click on the OK option to close the System Properties window and enable remote desktop.
Step 7: Go back to the Server Manager, check the Remote Desktop option, it may still show as Disabled until you refresh it. Click on the refresh sign or press F5 on the keyboard, once you refresh it you can see the status as Enabled.
Woohoo!!! The remote desktop is now Enabled and ready to use!
Note: The above steps can also be performed in a Command Prompt or PowerShell terminal.
To Enable Remote Desktop With PowerShell use the below process:
PowerShell cmdlet used for enabling remote desktop, we can use the Set-ItemPropery cmdlet to change the set value that enables or disables Remote Desktop:
Command:
Set-ItemProperty -Path ‘HKLM:\System\CurrentControlSet\Control\Terminal Server’ -name “fDenyTSConnections” -value 0
Once done you can use the ‘Enable-NetFirewallRule’ to configure Windows Firewall to enable remote desktop connections:
Use the below command-
Enable-NetFirewallRule -DisplayGroup “Remote Desktop”
Now, the Remote Desktop is accessible in Windows Server 2016.