This article assists with establishing private nameservers for dedicated and VPS servers. Obtaining an IP address for your domain nameservers is the initial stage in this process.
Important instructions:
If the IP addresses are not listed in your welcome email, you may always contact our support staff.
Once you have the IPs, you may have your domain registrar register the nameservers.
Get in touch with the firm that registered your domain name if you need nameserver support.
You must configure the nameservers on the server once they have been registered.
Now, let us follow the steps:
- Log in to WHM.
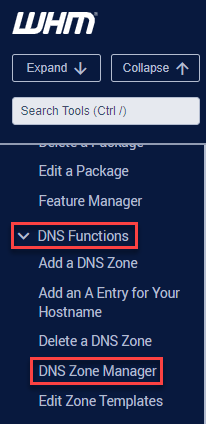
- Select the “DNS function” option and then click on the “DNS zone Manager” sub-option.

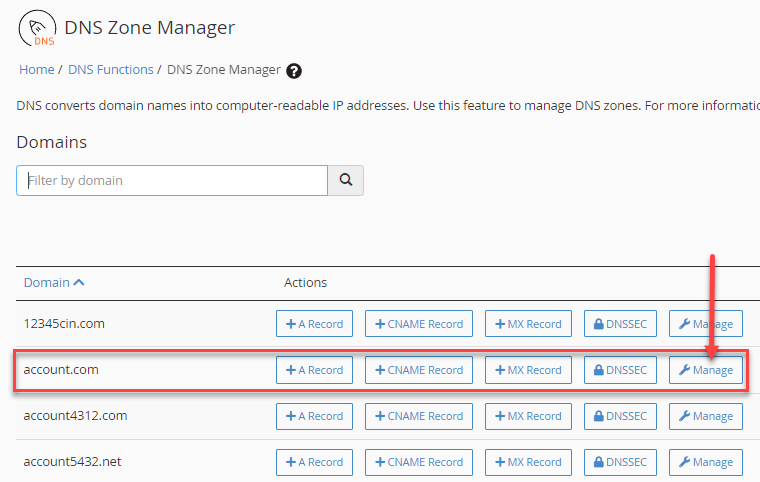
- Select the “Domain” whose nameservers you wish to set.
- Click on the “Manage” button.

- Your primary nameserver and usable email address must be updated in your SOA record.
- After registering the nameservers, create “A records” for “ns1.domain.com” and “ns2.domain.com” that point to the IP addresses you used. Click on the “Save all records” button.
- It is important to remember that the newly created personal nameservers should also be used on the domain registrar side as well as in WHM >> DNS Zone Manager >> domain name in question >> NS records and SOA records if you wish to use them for the domain name itself (use nameservers ns1.yourdomain.com and ns2.yourdomain.com for yourdomain.com).
- WHM has a Basic WebHost Manager Setup >> Basic Config menu, where you can add your nameservers for all newly created cPanel accounts (and all addons before they are added to cPanel).
- It takes 24 to 72 hours for the DNS modifications to spread internationally and relish your hosting.
This is how the private nameservers for dedicated and VPS servers are structured. Hope you enjoyed our article! For any such information do visit our Kb section regularly.
