This article will show you how to use cPanel’s File Manager to upload and download files between your website and your computer.
What is File Manager?
- The File Manager is a web-based interface that permits you to manage all of the files related to your account.
- You can upload files directly through cPanel using the File Manager.
- It lets you manage your site via HTTP, allowing you to upload, create, and delete files, organise them into folders, and change file permissions.
Upload a file to your Website:
File Manager is useful for transferring some files quickly. However, if you want to transfer a large number of files or need to use advanced file transfer features, you should use a dedicated FTP client.
Follow these steps to upload a file using File Manager:
- Log in to your cPanel account.

- Click File Manager, in the FILES section of the cPanel home screen.

- Navigate to the directory where you want to upload the file in the File Manager main window. Click the Upload icon. The File Upload page will appear.

- Once the File Upload page appears, select the Overwrite existing files check box to overwrite a file on the server with the same filename.
- Select a file.

- Navigate to the file’s location on your computer and double-click it. The file uploads immediately as shown in the image below.

Steps 5 through 8 should be repeated for each additional file you want to upload.
Download a file to your Website:
To download a file using File Manager, follow these steps:
- Log in to your cPanel account.

- Click File Manager, in the FILES section of the cPanel home screen.

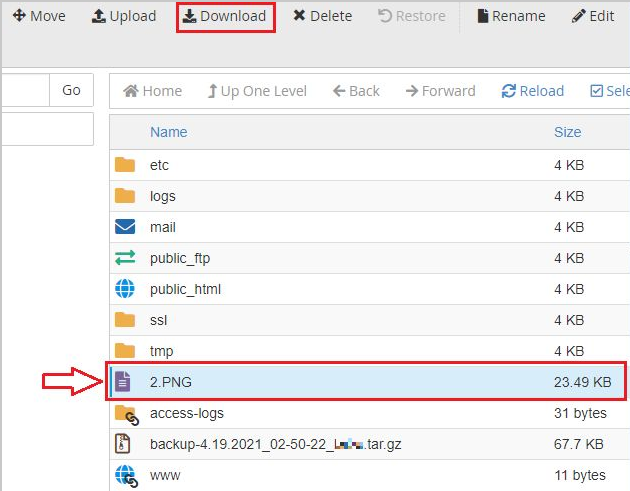
- Select a file.
- Click the file that you want to download.

- Click the Download icon. The file downloads as shown in the image below.

- Navigate to the directory on your local computer where you want to save the file, and then save the file.
In this manner, you can use the file manager in cPanel to upload and download files.
If you want to increase the upload limit, Kindly refer to our guide on How to Increase the Upload Limit in phpMyAdmin
