
This article explains how to enable SSH access for a cPanel account on a VPS using WHM by assigning shell access and configuring SSH key-based authentication. Using SSH keys is the recommended and more secure method for server access.
Steps to enable SSH access for a cPanel account on a VPS via WHM:
Step 1: Log in to WHM.
Step 2: Enable Shell Access Using “Manage Shell Access”.
- Open the WHM account and go to:
Home > Security Center > Manage Shell Access - All of the server’s cPanel accounts will be listed.
- Find the account for which SSH access is needed.
- Change the shell type to one of the following:
- Jailed Shell (recommended for security)
- Normal Shell (full shell access – not recommended)
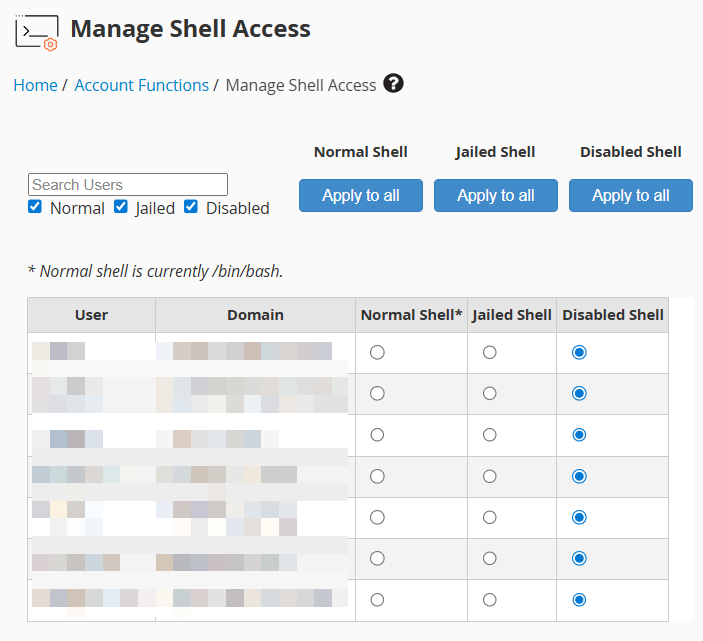
- Click Save to apply the changes.
Step 3: Generate SSH Keys for the cPanel Account
- Log in to the user’s cPanel account when shell access is enabled.
- Navigate to:
cPanel > Security > SSH Access - After choosing Manage SSH Keys, select Generate a New Key.
- Enter the following information:
- Key Name: Any descriptive name
- Key Password: Optional but recommended
- Key Type: RSA
- Key Size: 2048 or 4096 bits (recommended)
- Click Generate Key.
Step 4: Authorise the SSH Key
After generating the key, go to SSH Access in cPanel again:
- Under Public Keys, locate the newly created key.
- Click Manage.
- Click Authorise, then confirm.
This step is compulsory to let SSH log in using the key.
Step 5: Connect to the Server through SSH
Use an SSH client to connect from a local system:
ssh username@server-ip
You will be asked to enter the key password if one has been created.
Step 6: View, Download, and Convert the SSH Private Key (Windows Users)
After approving the SSH key, you must download and convert the private key if you are connecting from a Windows system using PuTTY.
- View or Download the Private SSH Key
- Open the cPanel account and go to:
cPanel > Security > SSH Access > Manage SSH Keys - Under Private Keys, locate the key and click View/Download.
- You will find the private key in the subsequent format:
—–BEGIN OPENSSH PRIVATE KEY—–
…
—–END OPENSSH PRIVATE KEY—– - You may either download the key file directly or copy and save the contents on your local system.
- Open the cPanel account and go to:
- Convert the Private Key to PPK Format (PuTTY)
PuTTY requires keys in PPK format.
From the View/Download page:- Click Convert
- When asked, enter the passphrase used while generating the key
- Click Convert
Download the converted .ppk file to your local machine.
- Connect Using PuTTY
- Open PuTTY and configure the connection:
- Host Name: server-ip
- Port: 22 (or custom SSH port)
- Connection Type: SSH
- Under: Connection > SSH > Auth. Browse and select the downloaded .ppk file.
- Click Open to connect.
- Open PuTTY and configure the connection:
Notes:
- The key has to be renewed if the passphrase is forgotten.
- Never give anyone access to the private key file.
- Compared to password-based SSH login, key-based authentication is more secure.
- Verify that the server firewall permits port 22 (or a custom SSH port).
- If the login is unsuccessful, confirm:
Shell access is enabled
SSH key is authorised - Correct username and server IP are used.
In this way, you can enable SSH access for a cPanel account on a VPS via WHM. If you encounter any issues during the process, feel free to contact the eukhost support team for assistance.