Once your WordPress website is installed, you’ll be eager to start creating great content for your readers, but before you start, there are some important administrative tasks to complete. The first of these is to configure your WordPress settings.
These settings control many of the ways your website operates and it’s vital to get the right configuration for your business needs. Thankfully, most of the default settings won’t need changing, but there some which you will need to customise.
To get started, we suggest that you log into your WordPress admin panel, find the Settings tab in the left-hand menu and click on it. When you do, it will expand, showing you the different settings areas you can control: General Settings, Writing, Reading, Discussion and Permalinks. We will begin with the General Settings.
Configuring WordPress General Settings
When you open your General Settings panel, you’ll notice that much of the information is already completed for you as you will have inputted it during your WordPress installation. However, this is the place where you can make changes if you need to.
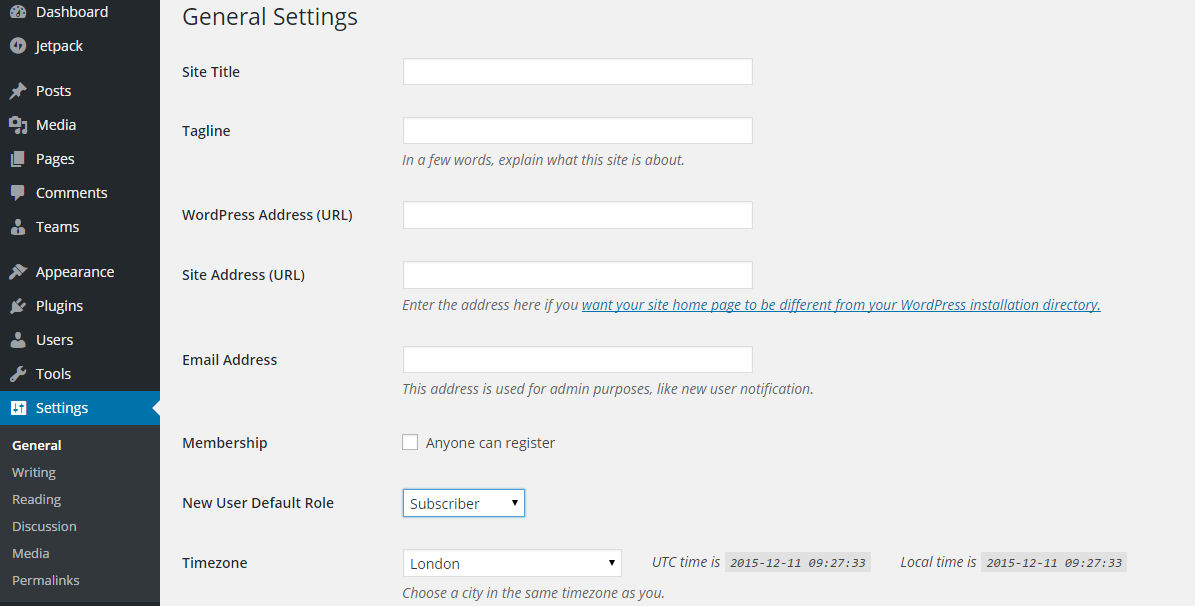
- Site Title:This is the name of your website (not the web address) and what you write here usually appears in the header of your website if you choose not to upload a logo or header image.
- Tagline:This is a short phrase, motto, company slogan or description of your business. It usually appears in the header, too, under the site title. You can choose to leave this box empty.
- WordPress Address (URL):When you created your site you will have made a choice about using www. or not in the site’s web address. The choice you made on installation will appear here. You should not change this once you have made your decision. However, if you obtain an SSL certificate for your website and change the URL from http to https, you should also change that information here.
- Site Address (URL): For the vast majority of users, this will be exactly the same as the WordPress Address (URL). The option is there because some (technically advanced) users choose to host their website files and WordPress files in different directories on their server.
- Email Address: WordPress can be set up to send you email notifications on many things: security issues, new comments, new subscribers, etc. This is where you enter the email address you want that information to be sent.
For security reasons, use an email address that doesn’t have your website’s domain name in it, i.e. if the website is joebloggs.com, don’t use a joeblogs.com email address. This is because, if you forget your password, this is the address it will be sent to, and using an email from your own domain can make it easy for hackers to guess at. - Membership: By default, this is left blank as members can be given access to the admin panel. However, if you are setting up a membership site (where people have to log in to access information) then you will need to check this box.
- New User Default Role: You should leave this set at subscriber. This gives members only limited access and they will not be allowed to post content or make any changes to the website. If you plan to have members, you will most likely use a membership plugin which will enable you to control exactly what your members can and cannot do. The important role in this list is the administrator. The administrator has full control of the WordPress admin panel and can make all the changes they wish including deleting and creating other administrators. You should make sure that only highly trusted members of your team are given administrative access.
- Timezone: Set the timezone to the one where your website is based. If in the UK, set it to London.
- Date and Time Formatting: Here you can choose your preferred format. Take into consideration where your primary audience will be based and use the formats that are the most acceptable to them. Remember in the UK we use day/month/year whilst in the US, they use month/day/year: 25/12/2015 Vs 12/25/2015
- Week Starts: This gives you the option, when analysing data created on WordPress, to choose the start and end point for weekly analysis.
- Language: You will have chosen this option during the WordPress install. It controls what language the WordPress admin is presented to you. It can also affect some spell checkers you install, so choose carefully between UK and US English.
Configuring WordPress Writing Settings
Writing settings allow you to configure the interface you use when writing new posts.
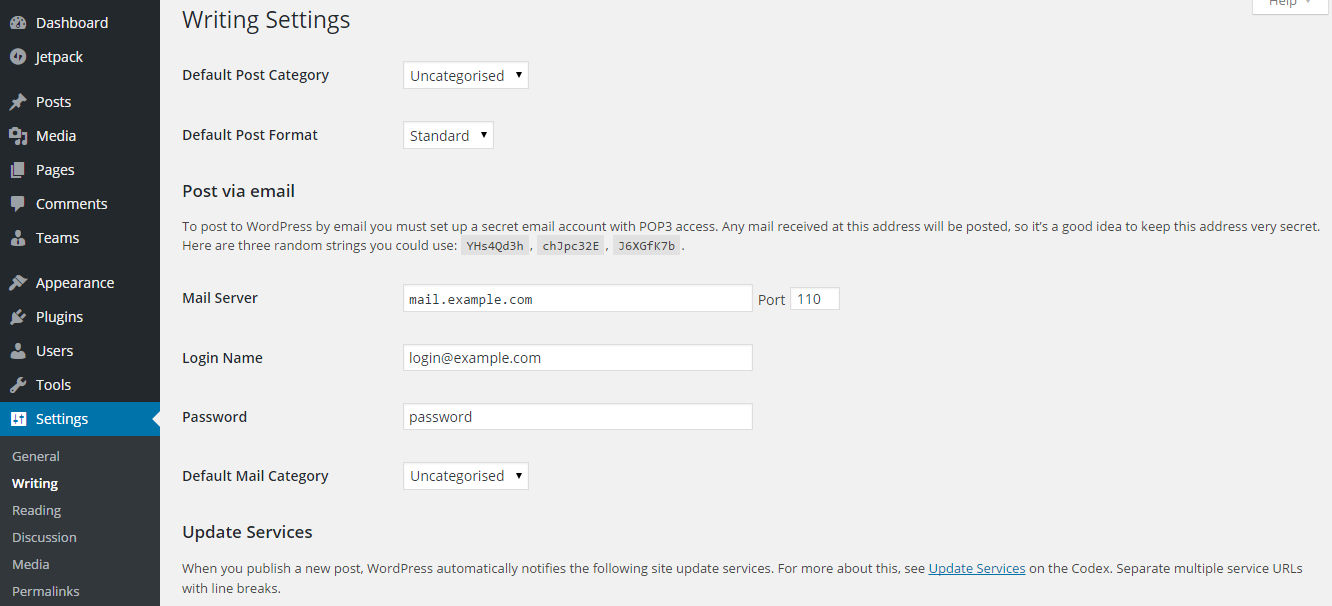
- Default Post Category: As you begin to add more and more posts to your website, you will want to put them into categories so that visitors can find them easily. The Uncategorized setting means that when you begin a new post, WordPress won’t automatically decide which category it appears in, you will have to make that decision yourself. The only reason to change this setting would be if the vast majority of your posts were going to be in one category.
- Default Post Format: There are a number of post formats you can choose from in WordPress, such as asides, galleries and quotes. The vast majority of content, however, will be written as standard posts for this reason, leave this default as it is.
- Post via Email: Unless you are going to submit and publish posts via email, you can leave this section as it is. If you do wish to email your posts rather than input them on a computer, then you need to input the details of the email address from which you will send your posts. All the information needed can be obtained from your POP3 email provider. The category option allows you to choose a default category for email posts to be published in as with the default post category above, it is best to leave this as uncategorized.
- Update Services: This is a tool that informs other websites on the internet that your blog has been updated so their users can get your latest posts. If you click the update services hyperlink on the Writing Settings page, you will be provided with a list of other services to add.
Configure WordPress Reading Settings
Reading settings allow you to control how posts are displayed to your blog visitors.
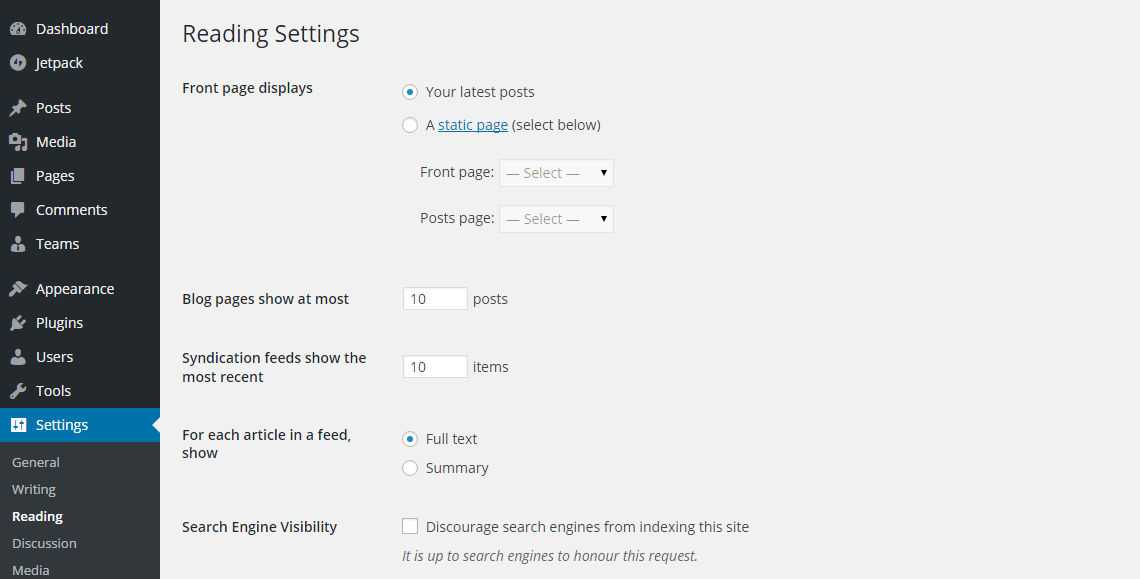
- Front Page Displays: Many blogs have a homepage which simply lists their recent posts. It’s the traditional bloggers way of doing things. If you are setting up a blog, you can choose to keep this setting. If, however, you are creating a different type of website, you will probably want to create a homepage that has specific information on it. If this is the case, you will need to change this option to Static Page. Before you can complete the change to Static Page, you will need to create two pages, one called Home and one called Posts. (You can do this by going to the Pages tab in the admin menu and selecting Add New Page. Give each page its title and then click Publish. ) Once you have created the pages, select the page called Home for Front Page and the page called Posts for Posts Page. You can go back and edit those pages later.
- Blog Posts to show at most:
If you choose to show your posts on the front page, the number you input here will dictate how many posts will be seen. If your blog contains more posts then you have chosen to show, there will be a link to subsequent pages at the bottom. The number you choose here will determine how many posts appear on the other pages and on any category pages too. - Syndication feeds show the most recent:
Some readers will opt to get your new posts through what is called RSS syndication. This basically means that they receive an email with your most recent posts. You can choose how many posts they get to see here. If you only publish a small number of posts, keep the number small or you will be constantly sending them older content. - Full text or summary option:
If someone gets the full post in an RSS feed, they will not need to visit your website. Giving a summary (usually the first few sentences) with a link to your site at the bottom means they will have to visit to read the rest of the article. For this reason, summary is often the preferred choice it increases your visitor numbers and they tend to view more than one post or page. - Search Engine visibility:
Turning this off doesn’t necessarily stop search engines visiting your site and indexing your pages for others to find it. If you don’t want information to be found online, don’t publish it on the internet. If you have a site which is not yet ready and you don’t want people to visit until it is finished, then you can use a maintenance plugin which will stop access and present a Coming Soon page.
Configuring WordPress Discussion Settings
Discussion settings allow to to control how comments posted by your visitors are displayed and moderated.
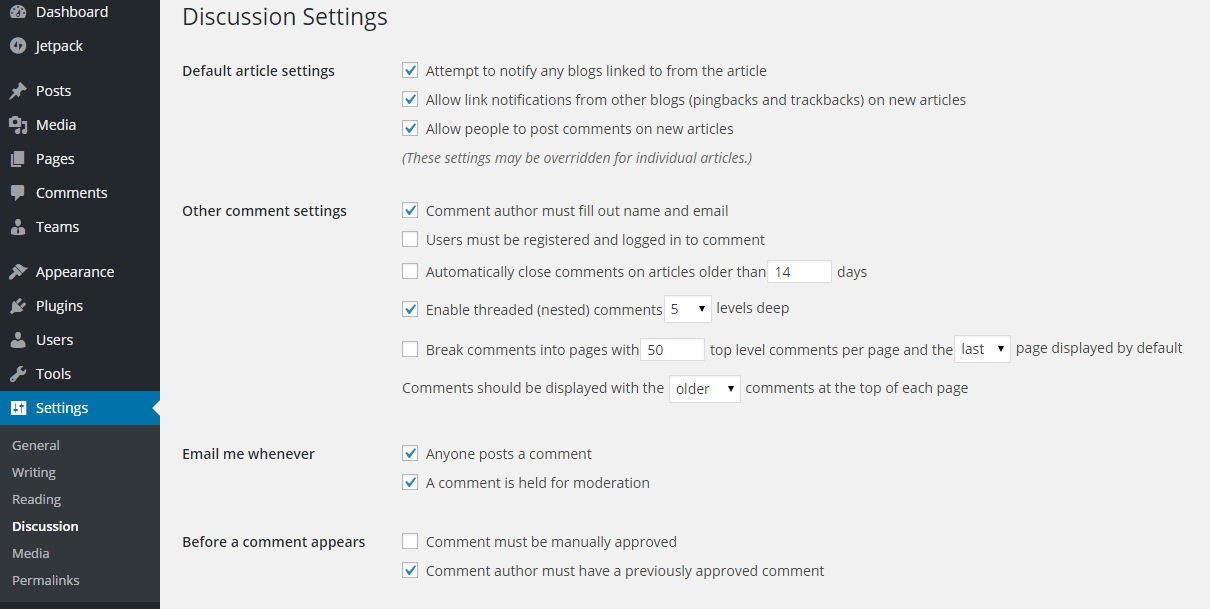
- Default article settings: It is useful to keep all three of these settings checked. Letting other websites know you have linked to them in a post or page not only shows good courtesy but can also be a useful way to encourage them to link to you, which could improve your SEO. Similarly, it can be helpful to you to know whether your posts have been linked to on other sites. Allowing people to posts comments is also useful for SEO and in building relationships with your visitors. If there is a particular page or post you don’t want comments on, such as your terms and conditions, you can turn them off for that post or page.
- Other Comment Settings: One of the downsides to allowing comments is that spammers will post comments on your site. They do this to create a backlink to their site, to advertise products or, in the worst cases, to try and put malware on people’s computers when they click on a link. Some spammers even use software to write comments for them. To stop the spammers and any other unwanted comments, without getting rid of the genuine discussion, requires a number of actions. On the Discussion Settings page you should do the following:
- Leave the default Other Comment Settings as they are.
Change the Before a Comment Appears option to Comment must be manually approved. By changing to manually approved comments, you don’t need to do anything in the blacklist boxes below because you will be able to remove inappropriate content before it goes live.
The one other step you should do is to activate the Askimet plugin. Spam is such a problem with WordPress that this plugin comes preinstalled. When you activate you will need to register on the Askimet site (it’s free), here you will get a code which you paste into the Askimet settings on your website. Once this is done, Askimet will filter and delete the vast majority of spam emails for you.
If you require a further layer of protection, you can always add a captcha plugin, so that people have to prove they are human before submitting a comment. This is one way to stop major spammers using software to write comments on your site. With Askimet doing the bulk of the work, you will find that the majority of comments you are asked to approve are genuine ones.
Want to dive deeper into WordPress comment management? Learn How to Manage Comments in WordPress? - Avatars: Avatars, especially when commenters use genuine photographs, can be useful features in comment sections of websites. If you do allow them, make sure that you select the default G Suitable for all audiences option to prevent users using inappropriate images.
WordPress Media Settings Configuration
You shouldn’t need to change the default Media Settings options as these will be configured to fit with your theme. Do be aware, that when you upload an image to WordPress, it creates multiple copies of different sizes: thumbnail, medium and large as well as keeping the original.
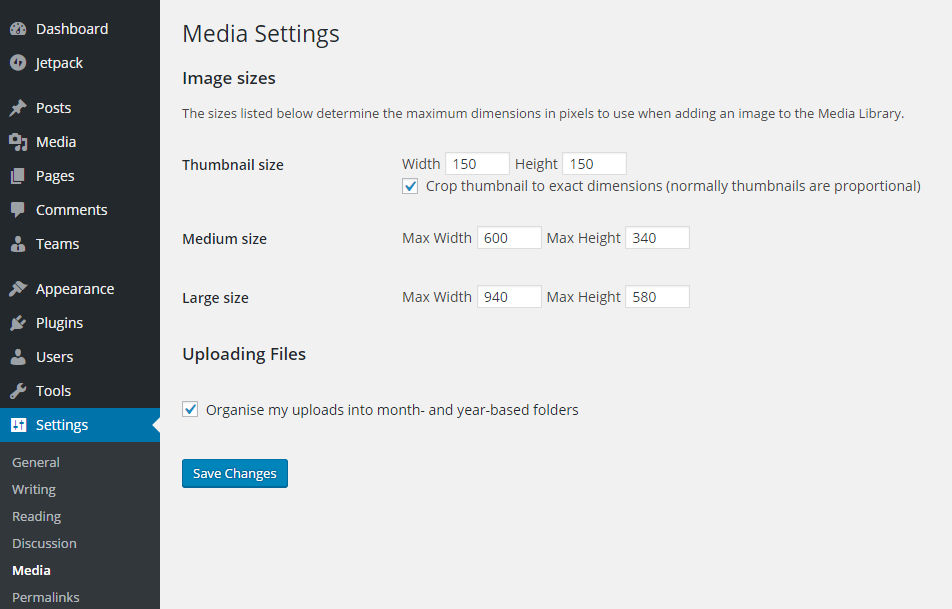
You shouldn’t need to change the default Media Settings options as these will be configured to fit with your theme. Do be aware, that when you upload an image to WordPress, it creates multiple copies of different sizes: thumbnail, medium and large as well as keeping the original. If you have a hosting package with a limited storage or file allocation, then keep a close check on the number of images you upload. You can get plugins which will help remove unnecessary images for you if you find yourself running out of space.
- Improve SEO by Configuring WordPress Permalinks
Each page, post and media item on your website will have its own web address that people can type into a search engine. In the permalink settings, you can control how those are created. You are given a number of options to choose from. For SEO purposes, it is advisable to use the Post Name option.
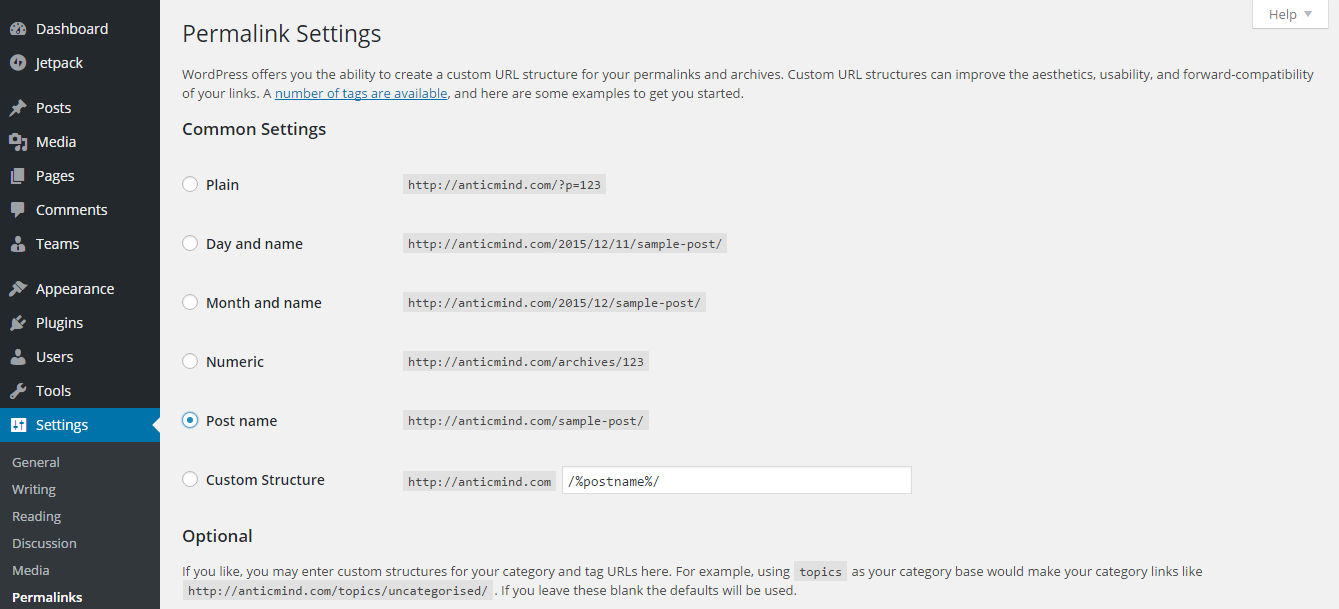
Each page, post and media item on your website will have its own web address that people can type into a search engine. In the permalink settings, you can control how those are created. You are given a number of options to choose from. For SEO purposes, it is advisable to use the Post Name option. This means that the web address (URL) of any item you publish would be the name of that item. E.g. If your site was called joebloggs.co.uk and you published an article called Best Blogs in Britain, the web address would be joebloggs.co.uk/best-blogs-in-britain. As the keywords are in the web address and the title, this makes it easier for search engines to understand their relevance for searchers. - Optional Settings: Leave the category and tag base custom options blank. The default structure works well enough for most users. You should only make adjustments here if there is a valid reason for doing so and if you fully understand how permalinks work.
Conclusion
If you follow these guidelines, you will have successfully configured the WordPress Settings. Your site will be optimised, less prone to spammers and hackers and more likely to rank well for key search terms.
As your site continues to grow and develop, you may need to make changes to some of the settings from time to time, though, for the most part, you will be able to forget about them and move on to the next stage in getting your website ready for launch.
If you are looking for first class, dedicated WordPress hosting that offers a comprehensive range of features, visit the eUKhost WordPress page to see our affordable hosting packages.


