This article will explain how to install an SSL certificate for your domain using Plesk.
Important: Before proceeding with these instructions you will need to have purchased an SSL certificate for your website from your web host or another vendor. If you still need to do this, you can purchase one here.
To install the SSL certificate in Plesk follow these instructions:
- Log into your Plesk account.
- Click on Domains in the left-hand panel and then select the domain you want to install the SSL certificate for.
- When the domain’s management screen opens, click on the SSL/TLS Certificates icon.
- When the SSL/TLS Certificates page opens, you will see an option to upload a .pem SSL certificate file in the right-hand column. If your SSL certificate is in another format, click on the Advanced Settings icon underneath.
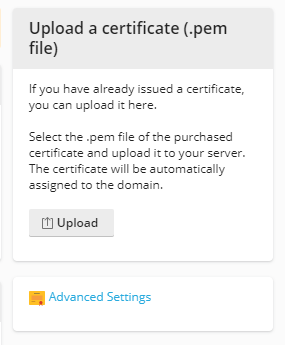
- Under Advanced Settings, there is a range of options you can choose from for installing different types of SSL Certificate.
- If you created a Certificate Signing Request (CSR) using Plesk and have received the certificate file, you can upload it here. Locate the .crt file on your computer using the Choose File option and then click on Upload Certificate.
Note: To generate a CSR using Plesk, navigate to Domains select the domain you want to add the certificate for and then click on SSL Certificates. Here, fill in the required fields and click Request. These certificates are self-signed and not valid for checks. - If you wish to upload an SSL certificate and private key pair that were generated on a different server, or if you wish to generate a self-signed certificate, click Add SSL/TLS Certificate.
- The Add SSL/TLS Certificate screen offers several options for installing an SSL Certificate.
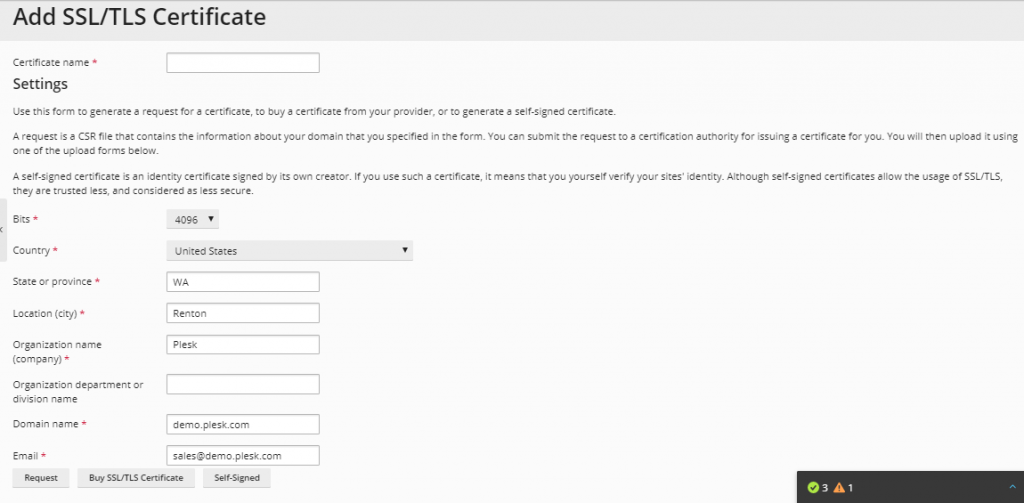
- The top section enables you to generate a request for a certificate, to buy a certificate from your web host or to generate a self-signed certificate through Plesk. Fill in the required details and click the desired option (Request/Buy/Self-Signed) at the bottom.
- The Upload the certificate files section enables you to upload certificates and private keys. Here click Choose file to select the files you wish to upload.
Note: If the certificate and private key parts of your certificate are contained in a *.pem file, select the same file for both as the private key and the certificate options. Once completed, click Upload Certificate.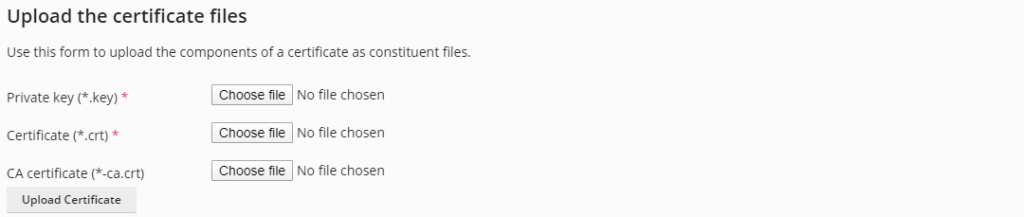
- Another option is to upload your SSL certificate as text.
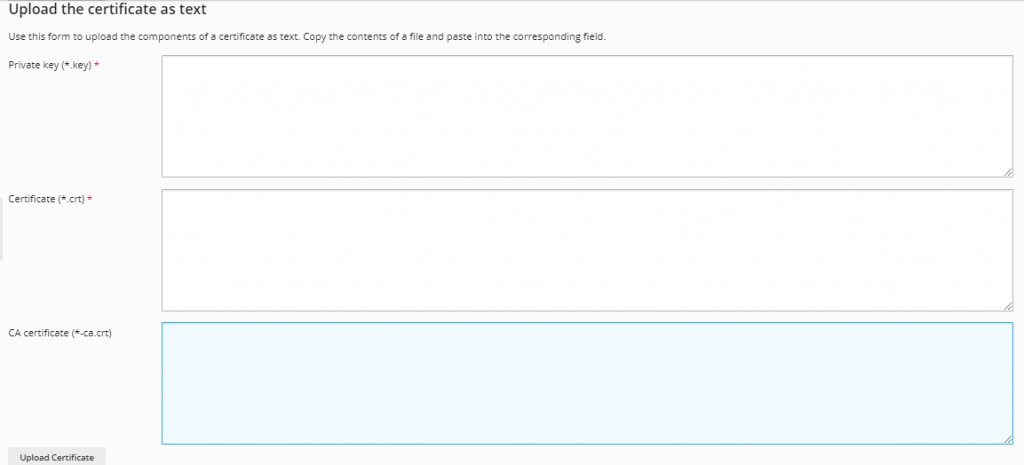
- If your SSL certificate is stored as a text, scroll to the Upload the certificate as text section. Here you can copy and paste the certificate and the private key texts into the corresponding fields. Once completed, click Upload Certificate.
- Once your certificate has been created, navigate to Domains, choose the domain you are installing the certificate for and click on Hosting Settings.
- Under Hosting Settings, find the Security section and check the SSL/TSL support box. Below, you will find the Certificate dropdown box. Select your certificate from the dropdown box and click OK. Your SSL Certificate should now be installed.
This way, you can install an SSL certificate for your domain using Plesk.
Read Here: How to Install a Free Let’s Encrypt SSL Certificate For a Domain in Plesk