In this article, we will explain how to use the service status feature in WHM.
In the world of WHM, think of a WHM-based server as a self-sustaining system. Numerous services are running, each with its task. If one service malfunctions, it could cause problems for others. It is crucial to track each service to ensure they are operational. WHM, a leading hosting platform, supports various third-party services. After installation, you can enable them to appear on the status page for easy monitoring via the WHM control panel.
This guide covers everything about the Service Status page. Let’s begin!
- Log into WHM.
- Search for “Service Status.”

- Click on “Service Manager.”

- As you scroll down, you’ll see the “Service Information” table. It has three columns-
- Service – Shows the name of the working service.
- Version – Displays the version of the working service.
- Status – Finally, this column shows its status. It should always say “up”!
- As you keep scrolling down, you’ll reach the “System Information” section. Here, you’ll find a table with rows showing-
- Server Load – Indicates the current server load.
- Memory Used – Displays the current memory usage.
- Swap Used – Shows the amount of swap memory used. Ideally, you want this to be at 0% all the time.

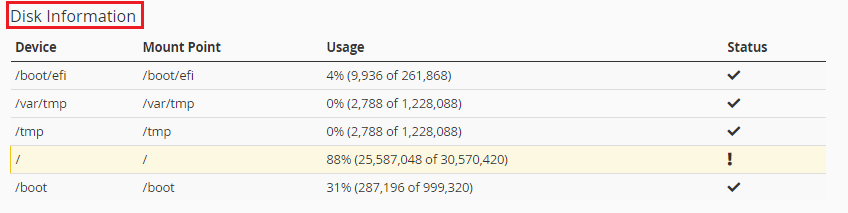
You will see the “Disk Information” section
- As you scroll down, you’ll see the “Service Information” table. It has three columns-
That’s the end of our guide on the “Service Status” feature in WHM. It might not have all the details, but it’s essential. If you have questions about this feature, reach out to our Technical Support Staff anytime through our ticketing system in the Client Area.