This article illustrates how to manually deactivate WordPress plugins through phpMyAdmin. For this, you will have to log in to your web hosting control panel. It is always suggested to make a backup of your database before making any changes, and exercise caution while editing to prevent unintended issues.
Follow the steps-
- Log in to your cPanel account provided by your web hosting provider.
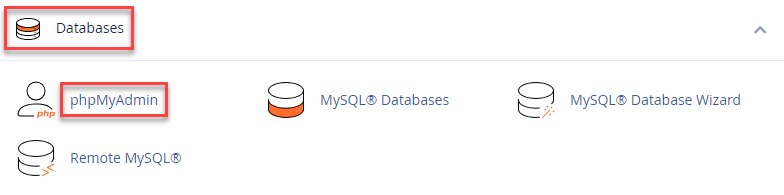
- In the cPanel dashboard, find the “Databases” section, and click on “phpMyAdmin”.
- From the phpMyAdmin interface, select the database that corresponds to your WordPress site.
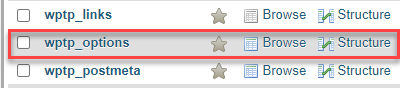
- Look for and click on the “wp_options” table (or any custom prefix you might have used during installation).
- Scroll down or use the search feature to locate the “active_plugins” row under the “option_name” column, and click to edit it.
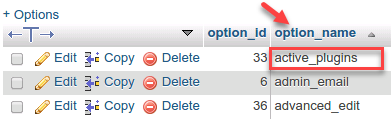
- To deactivate all plugins, delete the contents of the field. To deactivate specific plugins, remove their entries from the serialized data. Each entry appears as s:19:”plugin-folder/plugin-file.php”;.
- Click “Go” or “Save” to save the modifications.

- If caching plugins or mechanisms are active, clear the cache to ensure changes take effect immediately.
- Visit your WordPress site to confirm that the plugins are deactivated as expected.
Wasn’t it useful to you? If you liked our article, then you will surely love our support. For additional assistance, get in touch with our support team at any difficult moment.
Also Read : How to Turn off Plugins Without WP Admin Access